A tutorial on OpenGL/OpenCL interoperability in Python
In the last two posts, I've shown how to use OpenCL for GPGPU, and OpenGL for graphics rendering, with Python. Here I'll show how both OpenCL and OpenGL can be used at the same time with Python. It's called OpenCL-OpenGL interoperability. What is it about?
- OpenGL gives low-level access to the graphics card to do real-time graphics rendering with hardware acceleration in an hardware-independent way.
- OpenCL gives low-level access to the graphics card to do general-purpose intensive vectorized computations with hardware acceleration in an hardware-independent way.
- OpenCL/OpenGL interoperability allows to do intensive arbitrary computations for real-time graphics rendering.
Broadly speaking, the GPU is natively designed to perform highly-efficient vectorized linear computations (matrix transforms, rasterization...), for up to four dimensions (3D + 1D for homogeneous coordinates). 2D and 3D graphics rendering was indeed the only use for a GPU originally. GPGPU languages such as OpenCL give the developer access to a C-like language for doing hardware-accelerated high-dimensional or non-linear computations on the GPU, generally for non-graphical purposes. However, such general computations may actually be necessary for some specific graphical purposes: physical simulations, mathematical rendering, etc. In those cases, the most efficient way of using OpenCL for graphical data is to let the data on the GPU at all times. Data transfers between the CPU and the GPU are known to be slow and form a major bottleneck in those situations.
With OpenCL-OpenGL interoperability, one can execute OpenCL code on the same data buffers than those used by OpenGL for graphics rendering. The GPU is responsible for both OpenCL computations and rendering, and the data stays in GPU memory at all times.
If one does not have an OpenCL-compatible graphics card, then the code still works as expected. However, data transfers between the CPU and the GPU are not avoidable since the OpenCL kernel actually executes on the CPU in this case. This happens automatically and transparently. Hence, as for standard OpenCL code, a program making use of OpenCL-OpenGL interoperability can still work on a computer that does not include a compatible GPU. This is a very interesting point regarding software portability.
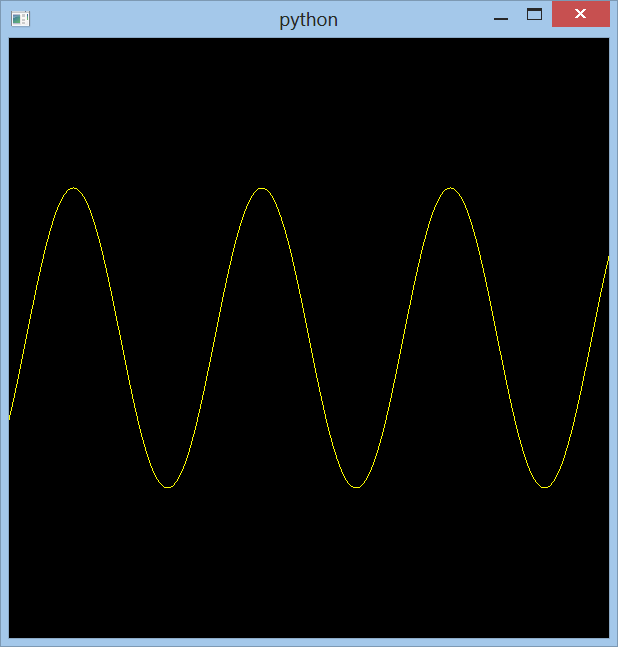
I will now describe a simple script illustrating OpenCL-OpenGL interoperability. This script initializes an empty OpenGL VBO and an OpenCL buffer containing points on an horizontal line. An OpenCL kernel then copies the points from the OpenCL buffer to the OpenGL one and transform the \(y\)-coordinate according to a sine function. This function is then displayed on the screen.
Installation
This script requires Numpy, PyOpenGL, PyOpenCL, and an OpenCL SDK with OpenGL interoperability support. Also, on some platforms (like Windows 8 apparently), the Python process needs to be run as an administrator so that this script can work.
OpenCL initialization
OpenCL needs to be initialized with OpenGL interoperability. This code snippet does just that:
def clinit():
    """Initialize OpenCL with GL-CL interop.
    """
    plats = cl.get_platforms()
    # handling OSX
    if sys.platform == "darwin":
        ctx = cl.Context(properties=get_gl_sharing_context_properties(),
                             devices=[])
    else:
        ctx = cl.Context(properties=[
                            (cl.context_properties.PLATFORM, plats[0])]
                            + get_gl_sharing_context_properties())
    queue = cl.CommandQueue(ctx)
    return ctx, queue
This code comes from this blog post.
This function returns an OpenCL context object, and a command queue used for compiling and executing kernels, and for initializing OpenCL buffers.
Buffers initialization
The trickiest part concerns the initialization of the buffers. First, such
initialization needs to occur after OpenGL initialization, but before
any OpenGL rendering. Placing the following code in the initializeGL()
function does the trick.
Next, we need here three buffer objects.
-
A standard OpenGL VBO: we tell OpenGL that we may write to this buffer several times (since the OpenCL kernel has access to it) with the
usage=GL_DYNAMIC_DRAWkeyword argument. This buffer initially contains only zeros.# empty OpenGL VBO self.glbuf = glvbo.VBO(data=np.zeros(self.data.shape), usage=gl.GL_DYNAMIC_DRAW, target=gl.GL_ARRAY_BUFFER) self.glbuf.bind()
-
A standard OpenCL buffer: in our example, this buffer contains the "source" data, a N*2 Numpy array containing points of coordinates \((x,0)\) with \(x \in [-1,1]\). It is read-only since we just need access to this buffer to copy data from it to the OpenGL VBO. Also, we initialize OpenCL right after the OpenGL VBO creation, and just before the OpenCL buffer creation.
# initialize the CL context self.ctx, self.queue = clinit() # create a pure read-only OpenCL buffer self.clbuf = cl.Buffer(self.ctx, cl.mem_flags.READ_ONLY | cl.mem_flags.COPY_HOST_PTR, hostbuf=self.data)
-
An interop object to access an OpenGL VBO from OpenCL: this object is passed to the OpenCL kernel and allows direct access to the OpenGL VBO.
# create an interop object to access to GL VBO from OpenCL self.glclbuf = cl.GLBuffer(self.ctx, cl.mem_flags.READ_WRITE, int(self.glbuf.buffers[0]))
Finally, once these buffers have been created, we can compile the OpenCL kernel.
# build the OpenCL program
self.program = cl.Program(self.ctx, clkernel).build()
# release the PyOpenCL queue
self.queue.finish()
Kernel code
The OpenCL kernel accepts two arguments: pointers to the OpenCL buffer (with source data), and to the OpenGL VBO. We first get the array index in the current thread, then we copy the data from the OpenCL buffer to the OpenGL VBO, and transform the y-coordinate through a sine function.
# OpenCL kernel that generates a sine function.
clkernel = """
__kernel void clkernel(__global float2* clpos, __global float2* glpos)
{
//get our index in the array
unsigned int i = get_global_id(0);
// copy the x coordinate from the CL buffer to the GL buffer
glpos[i].x = clpos[i].x;
// calculate the y coordinate and copy it on the GL buffer
glpos[i].y = 0.5 * sin(10.0 * clpos[i].x);
}
"""
Kernel execution
The second trickiest part is the kernel execution. Indeed, OpenCL needs to get
a secure access to the OpenGL VBO in order to avoid problems of concurrency
(since OpenGL also needs to access to this resource). Secure access is obtained
and released with the functions enqueue_acquire_gl_objects() and
enqueue_release_gl_objects(). The parameters are the queue returned by
our function clinit(), and a list of interop objects to access (here, just
the glclbuf object).
Then, the actual kernel execution is in PyOpenCL similar to PyCUDA: the
program object has a method with the same name as the kernel name. The
parameters include the OpenCL queue, the global and local worksizes, and
the arguments to the kernel.
def execute(self):
"""Execute the OpenCL kernel.
"""
# get secure access to GL-CL interop objects
cl.enqueue_acquire_gl_objects(self.queue, [self.glclbuf])
# arguments to the OpenCL kernel
kernelargs = (self.clbuf,
self.glclbuf)
# execute the kernel
self.program.clkernel(self.queue, (self.count,), None, *kernelargs)
# release access to the GL-CL interop objects
cl.enqueue_release_gl_objects(self.queue, [self.glclbuf])
self.queue.finish()
Here, we call this function in initializeGL(), after the buffers creation.
This way, we update the OpenGL VBO through the OpenCL kernel only at
initialization time.
But it would be more useful in a real application to execute the kernel
in the paintGL() method.
OpenGL rendering
The paintGL() function is very similar to the previous OpenGL tutorial, and
has nothing to do with OpenCL. We activate the VBO and tell OpenGL to draw
consecutive segments of lines (GL_LINE_STRIP).
Note: apparently, in OpenGL, using single precision floating point numbers is better than using double precision float point numbers. The graphics card may not indeed support the latter format. I used doubles in an early version of this post and I had some nasty memory access violation crashes in particular cases. They disappeared when I switched to floats. If this is helpful to anyone...
def paintGL(self):
"""Paint the scene.
"""
# clear the GL scene
gl.glClear(gl.GL_COLOR_BUFFER_BIT)
# set yellow color for subsequent drawing rendering calls
gl.glColor(1,1,0)
# bind the VBO
self.glbuf.bind()
# tell OpenGL that the VBO contains an array of vertices
gl.glEnableClientState(gl.GL_VERTEX_ARRAY)
# these vertices contain 2 simple precision coordinates
gl.glVertexPointer(2, gl.GL_FLOAT, 0, self.glbuf)
# draw "count" points from the VBO
gl.glDrawArrays(gl.GL_LINE_STRIP, 0, self.count)
Full script
Here is the full script.
# PyQt4 imports
from PyQt4 import QtGui, QtCore, QtOpenGL
from PyQt4.QtOpenGL import QGLWidget
# PyOpenGL imports
import OpenGL.GL as gl
import OpenGL.arrays.vbo as glvbo
# PyOpenCL imports
import pyopencl as cl
from pyopencl.tools import get_gl_sharing_context_properties
# OpenCL kernel that generates a sine function.
clkernel = """
__kernel void clkernel(__global float2* clpos, __global float2* glpos)
{
//get our index in the array
unsigned int i = get_global_id(0);
// copy the x coordinate from the CL buffer to the GL buffer
glpos[i].x = clpos[i].x;
// calculate the y coordinate and copy it on the GL buffer
glpos[i].y = 0.5 * sin(10.0 * clpos[i].x);
}
"""
def clinit():
"""Initialize OpenCL with GL-CL interop.
"""
plats = cl.get_platforms()
# handling OSX
if sys.platform == "darwin":
ctx = cl.Context(properties=get_gl_sharing_context_properties(),
devices=[])
else:
ctx = cl.Context(properties=[
(cl.context_properties.PLATFORM, plats[0])]
+ get_gl_sharing_context_properties())
queue = cl.CommandQueue(ctx)
return ctx, queue
class GLPlotWidget(QGLWidget):
# default window size
width, height = 600, 600
def set_data(self, data):
"""Load 2D data as a Nx2 Numpy array.
"""
self.data = data
self.count = data.shape[0]
def initialize_buffers(self):
"""Initialize OpenGL and OpenCL buffers and interop objects,
and compile the OpenCL kernel.
"""
# empty OpenGL VBO
self.glbuf = glvbo.VBO(data=np.zeros(self.data.shape),
                       usage=gl.GL_DYNAMIC_DRAW,
                       target=gl.GL_ARRAY_BUFFER)
self.glbuf.bind()
# initialize the CL context
self.ctx, self.queue = clinit()
# create a pure read-only OpenCL buffer
self.clbuf = cl.Buffer(self.ctx,
                    cl.mem_flags.READ_ONLY | cl.mem_flags.COPY_HOST_PTR,
                    hostbuf=self.data)
# create an interop object to access to GL VBO from OpenCL
self.glclbuf = cl.GLBuffer(self.ctx, cl.mem_flags.READ_WRITE,
                           int(self.glbuf.buffers[0]))
# build the OpenCL program
self.program = cl.Program(self.ctx, clkernel).build()
# release the PyOpenCL queue
self.queue.finish()
def execute(self):
    """Execute the OpenCL kernel.
    """
    # get secure access to GL-CL interop objects
    cl.enqueue_acquire_gl_objects(self.queue, [self.glclbuf])
    # arguments to the OpenCL kernel
    kernelargs = (self.clbuf,
                  self.glclbuf)
    # execute the kernel
    self.program.clkernel(self.queue, (self.count,), None, *kernelargs)
    # release access to the GL-CL interop objects
    cl.enqueue_release_gl_objects(self.queue, [self.glclbuf])
    self.queue.finish()
def update_buffer(self):
"""Update the GL buffer from the CL buffer
"""
# execute the kernel before rendering
self.execute()
gl.glFlush()
def initializeGL(self):
"""Initialize OpenGL, VBOs, upload data on the GPU, etc.
"""
# initialize OpenCL first
self.initialize_buffers()
# set background color
gl.glClearColor(0,0,0,0)
# update the GL buffer from the CL buffer
self.update_buffer()
def paintGL(self):
    """Paint the scene.
    """
    # clear the GL scene
    gl.glClear(gl.GL_COLOR_BUFFER_BIT)
    # set yellow color for subsequent drawing rendering calls
    gl.glColor(1,1,0)
    # bind the VBO
    self.glbuf.bind()
    # tell OpenGL that the VBO contains an array of vertices
    gl.glEnableClientState(gl.GL_VERTEX_ARRAY)
    # these vertices contain 2 simple precision coordinates
    gl.glVertexPointer(2, gl.GL_FLOAT, 0, self.glbuf)
    # draw "count" points from the VBO
    gl.glDrawArrays(gl.GL_LINE_STRIP, 0, self.count)
def resizeGL(self, width, height):
"""Called upon window resizing: reinitialize the viewport.
"""
# update the window size
self.width, self.height = width, height
# paint within the whole window
gl.glViewport(0, 0, width, height)
# set orthographic projection (2D only)
gl.glMatrixMode(gl.GL_PROJECTION)
gl.glLoadIdentity()
# the window corner OpenGL coordinates are (-+1, -+1)
gl.glOrtho(-1, 1, 1, -1, -1, 1)
if __name__ == '__main__':
import sys
import numpy as np
# define a Qt window with an OpenGL widget inside it
class TestWindow(QtGui.QMainWindow):
def __init__(self):
super(TestWindow, self).__init__()
# generate random data points
self.data = np.zeros((10000,2))
self.data[:,0] = np.linspace(-1.,1.,len(self.data))
self.data = np.array(self.data, dtype=np.float32)
# initialize the GL widget
self.widget = GLPlotWidget()
self.widget.set_data(self.data)
# put the window at the screen position (100, 100)
self.setGeometry(100, 100, self.widget.width, self.widget.height)
self.setCentralWidget(self.widget)
self.show()
# create the Qt App and window
app = QtGui.QApplication(sys.argv)
window = TestWindow()
window.show()
app.exec_()
Final notes
Here are some interesting related links.